Indicates the current User Console perspective that you are using. Browse Files shows you how to locate your files and folders and the different actions you can do with them. Displays the Folders, Files, and Actions panes.
Version 1.1 - Getting Started
Overview
SuiteCRM Analytics User Console
The SuiteCRM User Console allows end users to run reports and dashboards that have been packaged with the default installation or created by the solution developers using the SuiteCRM Analytics client tools
Log In
Get started with SuiteCRM Analytics by following these steps to login:
-
Launch a Web browser and enter the URL of the SuiteCRM Analytics server. This will typically be http://localhost:8080/suitecrmanalytics if the server is running on your own machine
-
The page loads an introductory screen with a Login section.
-
Enter your user name and password and click Login.
The default login details for the admin user are below:
Username: admin
Password: password
Once you have successfully logged in you will be welcomed by the default homepage of the SuiteCRM Analytics User Console
About SuiteCRM Analytics Perspectives
The SuiteCRM Analytics User Console interface uses perspectives to extend your ability to work on different tasks at any given time. By default the User Console has the Home, Browse, Opened, Schedules and Administration perspectives.
Home
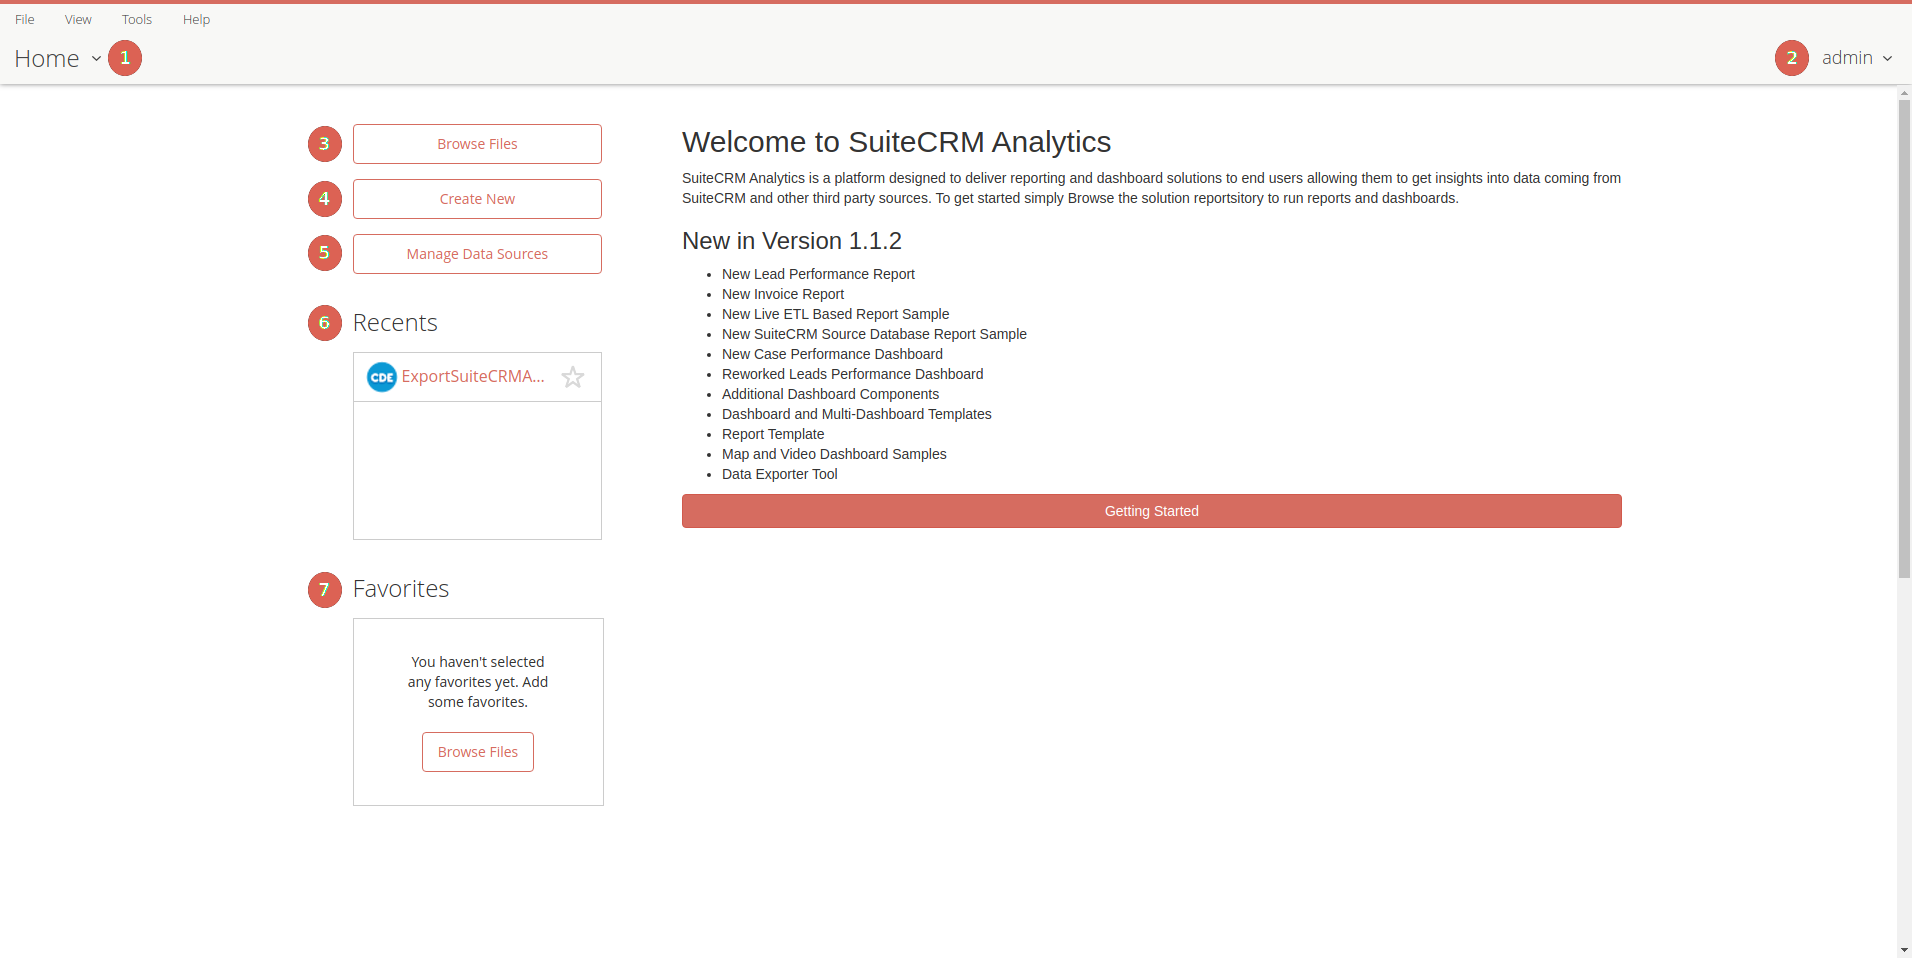
The first thing you see after you log into the SuiteCRM Analytics User Console is the Home perspective, which serves as the portal for you to access tools and features. Home contains easy access buttons so that you can Browse Files, Create New dashboards, view Documentation, and quickly open recently viewed or favorite files.
| Item | Name | Function |
|---|---|---|
1 |
Home Indicator |
Indicates the current User Console perspective that you are using. The Home menu lets you flip easily from page to page, or return to your Home page. |
2 |
Current User |
Shows the name of the person currently logged in to the User Console. Clicking the arrow next to the name lets you log out of the User Console. |
3 |
Browse Files |
Brings you to the Browse Files window, where you can locate your files using the Browsing and Files panes, and manage them using the Actions pane. |
4 |
Create new |
Gives you the option to create a new Dashboard. If you have permissions to work with Data Sources, this button also gives you the option to create a new Data Source. |
5 |
Manage Data Sources |
Allows administrators to manage new or existing data sources. |
6 |
Recents |
Shows a list of your most recently opened files. Clicking on the star next to a recently opened file adds it to your Favorites list. |
7 |
Favorites |
Shows a list of your favorite files for quick access. |
Browse Files
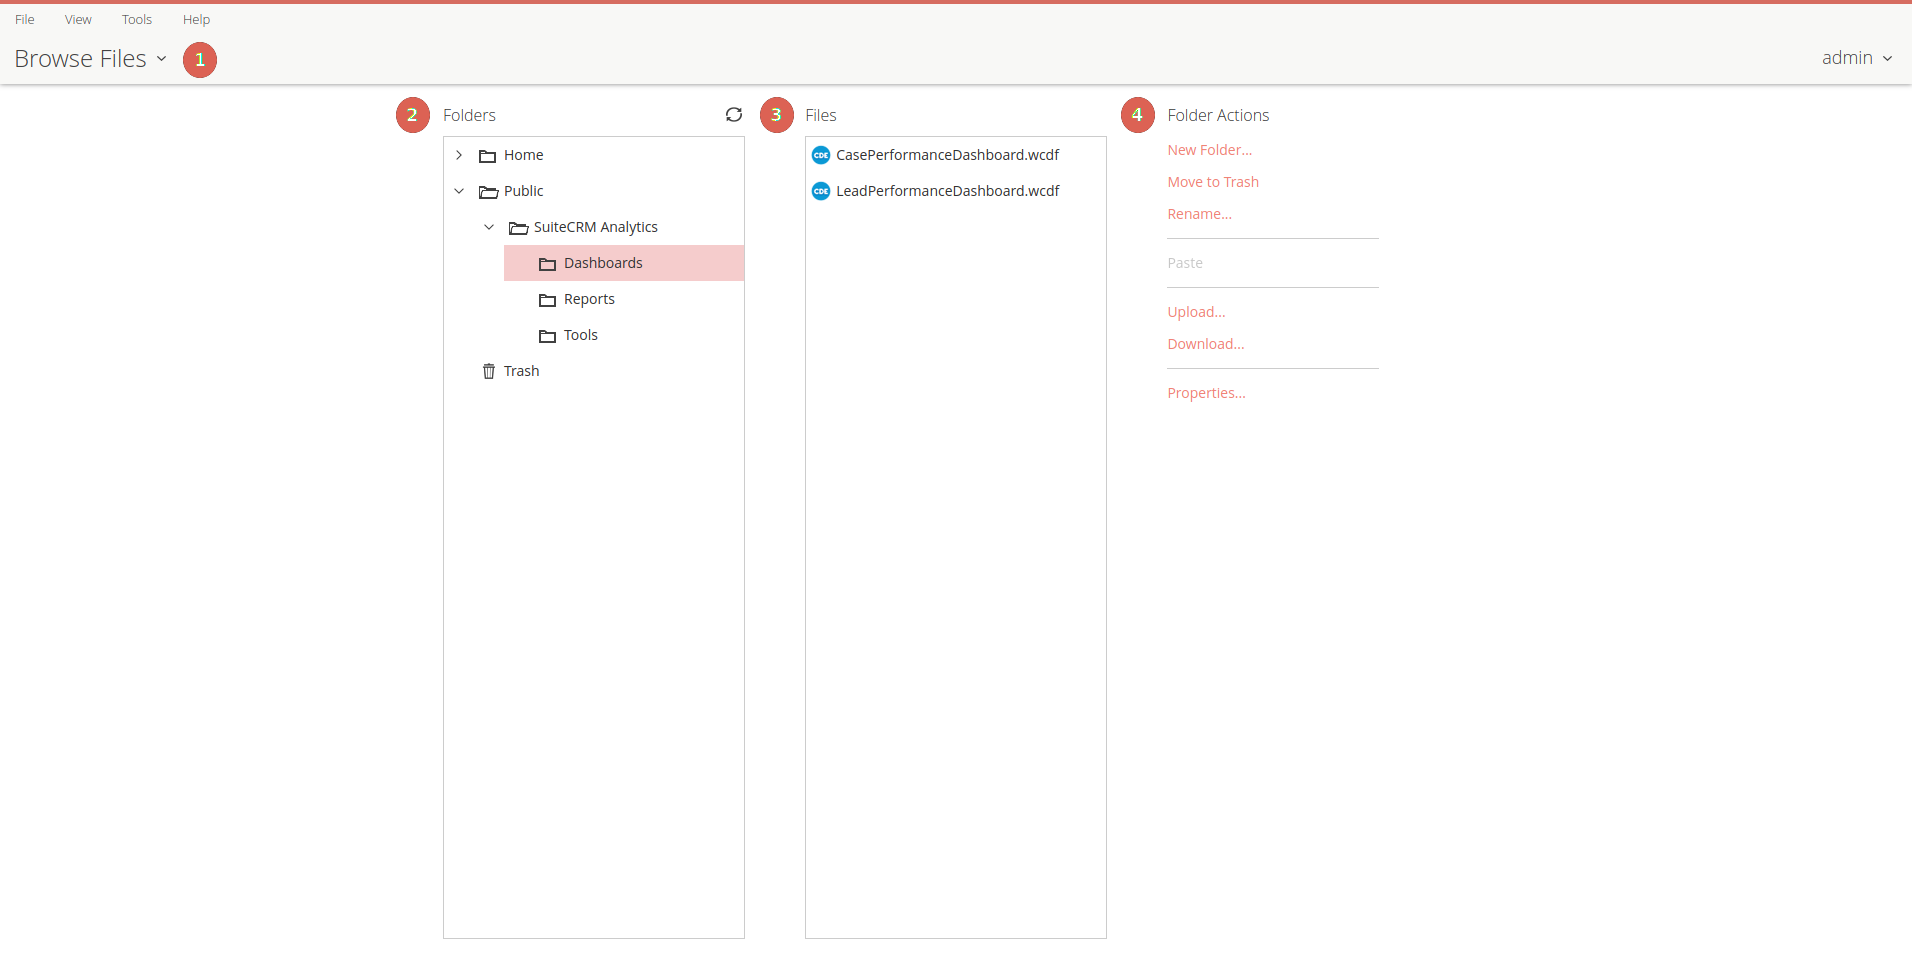
The Browse Files perspective helps you keep your files and folders organized and makes them easier for you to find and work with.
| Item | Name | Function |
|---|---|---|
1 |
Browse Files Indicator |
|
2 |
Folders |
Shows a list of folders that you can browse through to locate your files. You can also use the Browsing pane to create new folders or delete old ones. |
3 |
Files |
Generates and shows a list of all files contained in the folder that is selected in the Browsing pane. After you select a file, the Actions pane populates with a list of things you can do with the file. |
4 |
Actions |
The actions displayed depend upon the selection made in the Folders pane, as follows:
|
Opened
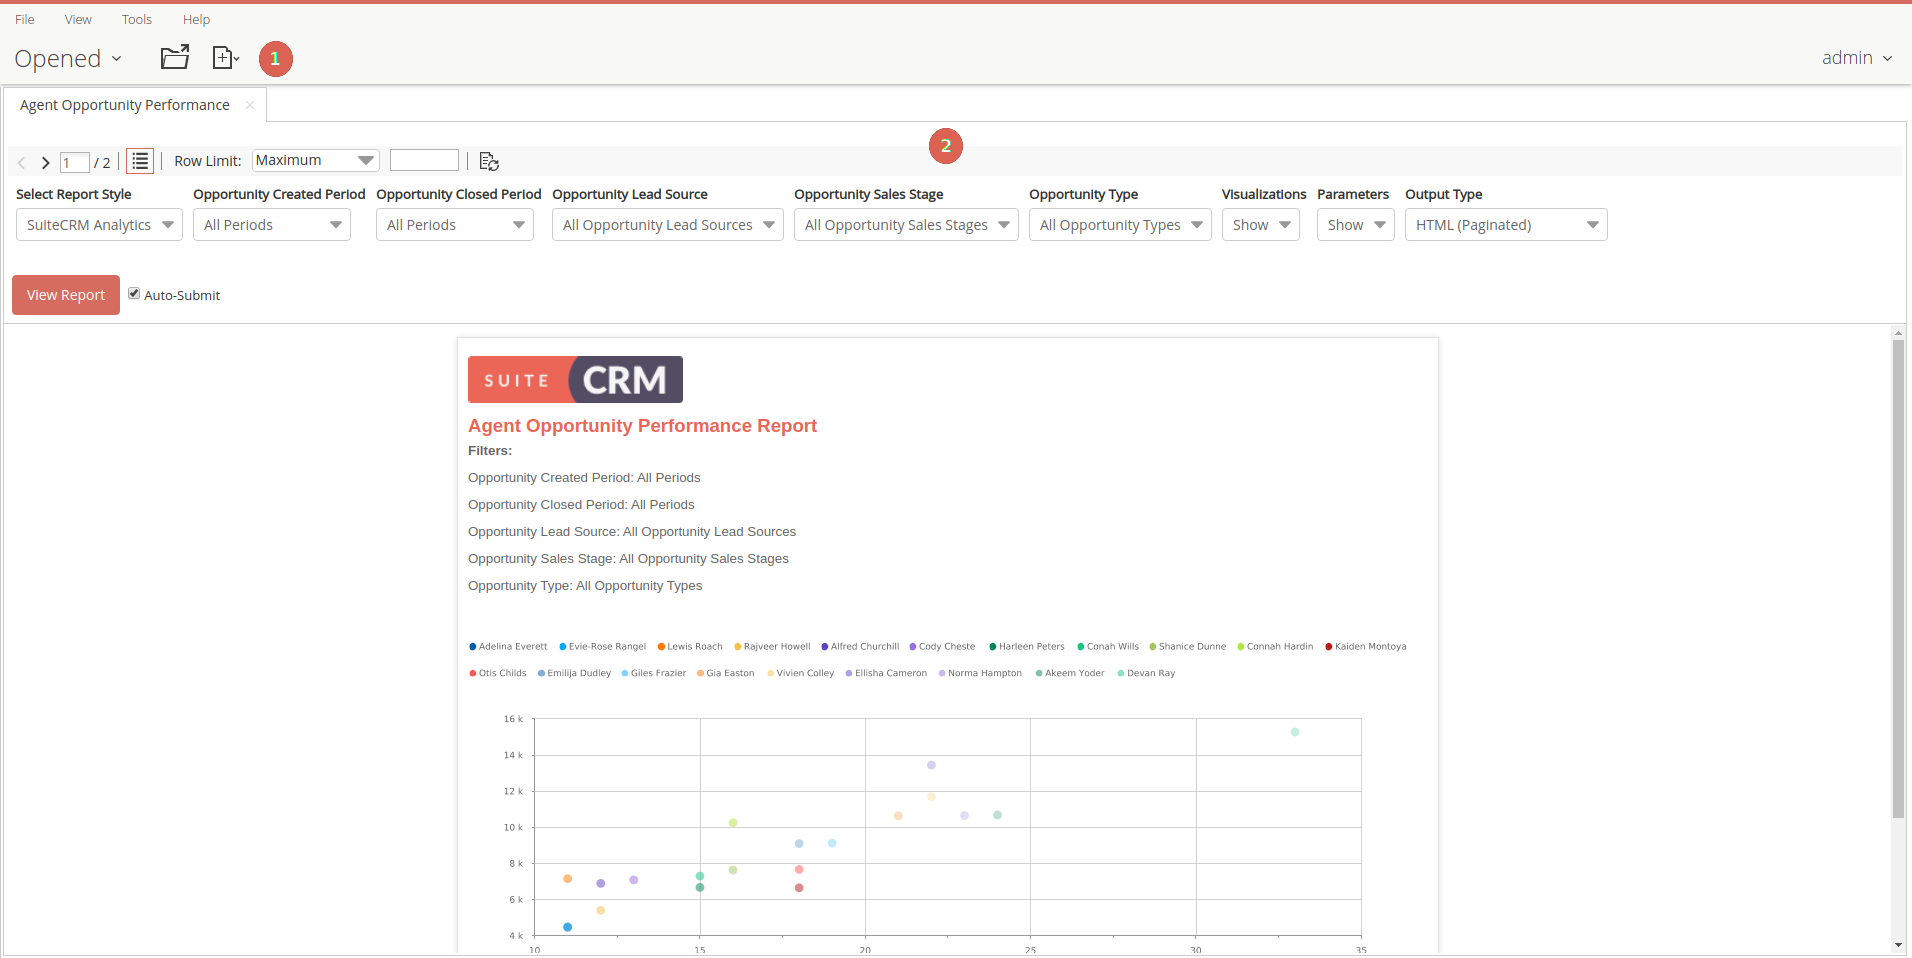
The Opened perspective uses plugins to provide access to different analytic capabilities. This perspective activates after you open a file from the Browse Files page. It provides a simple space to work with your files.
| Item | Name | Function |
|---|---|---|
1 |
Opened indicator Open… New Dashboard, or Data Source |
Indicates the current User Console perspective that you are using. Opened displays the files that you access from the Browse Files pane. Open… serves as a quick way to browse for more files to open without leaving the Opened page. These additional files open in new tabs across the Report Window. Quick start buttons to create a new Dashboard. You can also use this button to create a new Data Source, if you have permissions to work with data sources. |
2 |
Report and Dashboard Window |
Displays the file or report or dashboard that is currently opened, and lets you edit or work with the file. |
Schedules
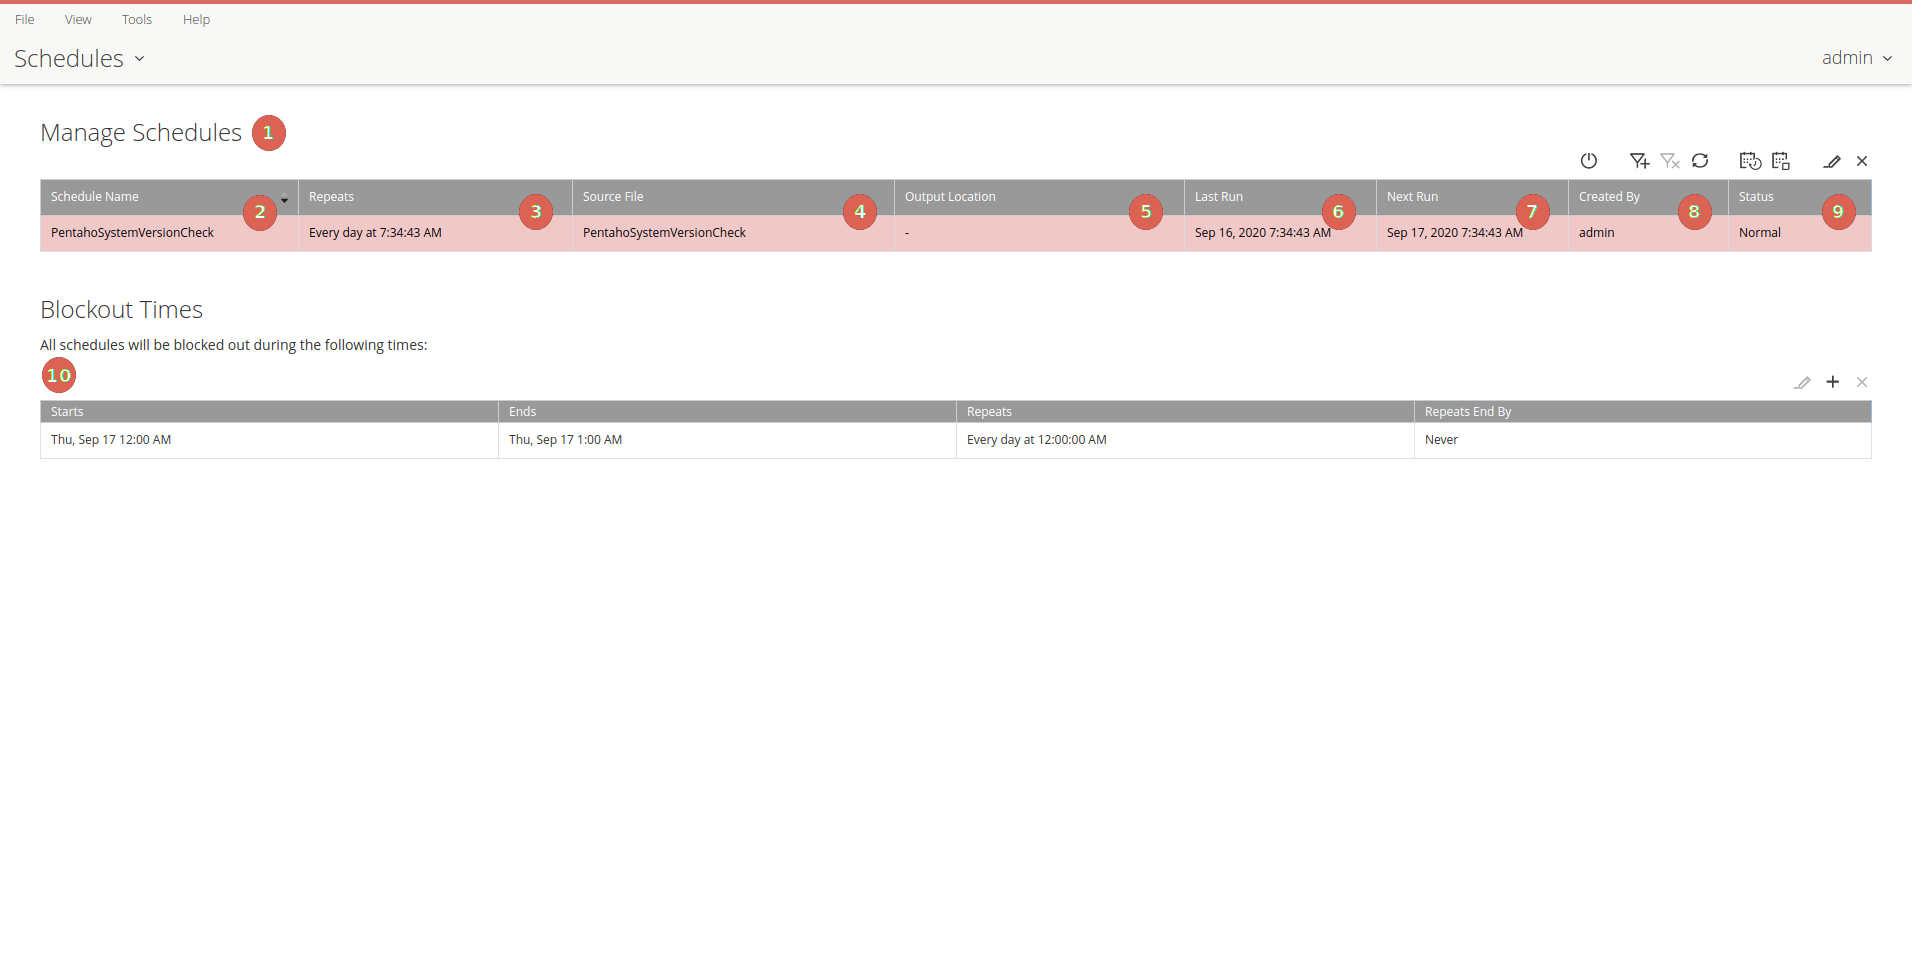
All of your active scheduled reports appear in the list of schedules, which you can get to by clicking the Home drop-down menu, then the Schedules link, in the upper-left corner of the User Console page.
The list of schedules shows which reports are scheduled to run, the recurrence pattern for the schedule, when it was last run, when it is set to run again, and the current state of the schedule.
| Item | Name | Function |
|---|---|---|
1 |
Schedule Indicator |
Indicates the current User Console perspective that you are using. Schedules displays a list of schedules that you create, a toolbar to work with your schedules, and a list of times that your schedules are blocked from running. |
2 |
Schedule Name |
Lists your schedules by the name you assign to them. Click the arrow next to Schedule Name to sort schedules alphabetically in ascending or descending order. |
3 |
Repeats |
Describes how often the schedule is set to run. |
4 |
Source File |
File Displays the name of the file associated with the schedule. |
5 |
Output Location |
Shows the location where the scheduled report is saved. |
6 |
Last Run |
Shows the last time and date when the schedule was run. |
7 |
Next Run |
Shows the next time and date when the schedule will run again. |
8 |
Created By |
The user who created the schedule |
9 |
Status |
Indicates the current Status of the schedule. The state can be either Normal or Paused. |
10 |
Blockout Times |
Lists the times when all schedules are blocked from running. |
Schedule Reports
You can use the Browse perspective to schedule a report to run at regular intervals, on certain dates and times, and with different parameters.
Administration
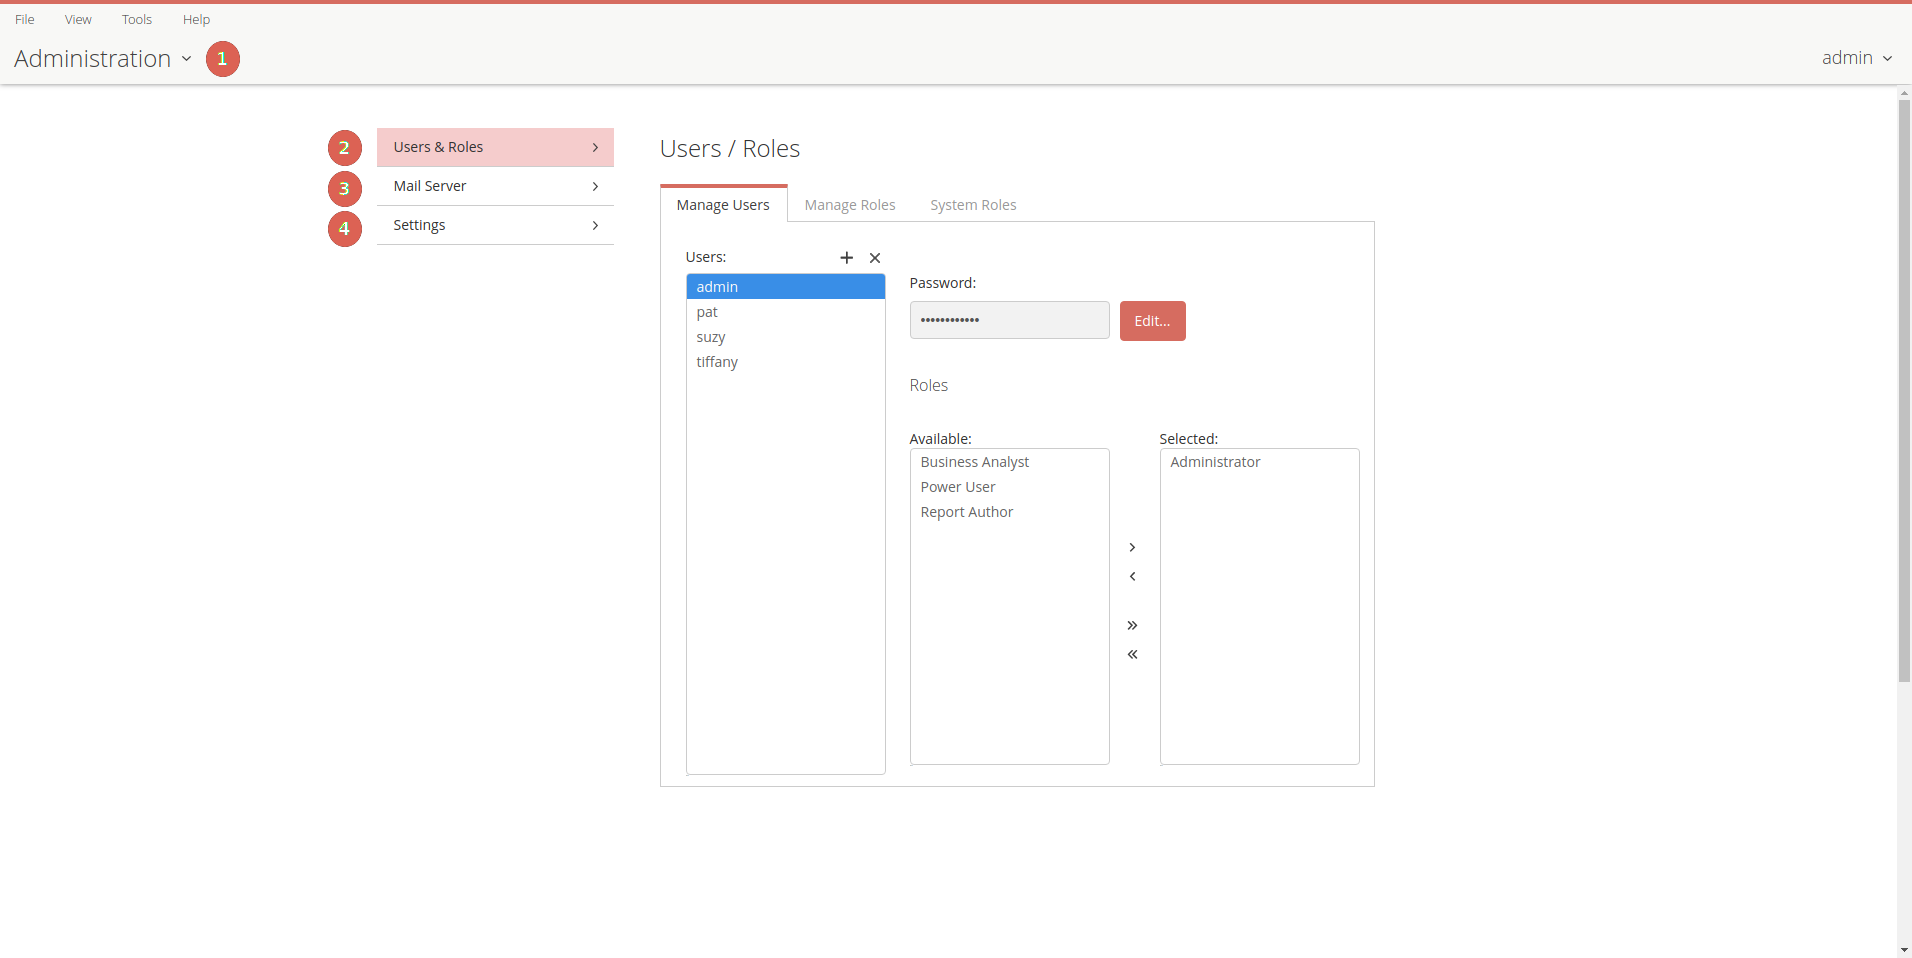
In the User Console, the Administration can be used by logged-on users assigned a role that has permissions to administer security can perform system configuration and maintenance tasks. If you see Administration in the left drop-down menu on the Home page, you can click it to reveal menu items specific to administration of the SuiteCRM Analytics Server. If you do not have administration privileges, Administration does not appear within the console.
| Item | Name | Function |
|---|---|---|
1 |
Administration |
The Administration perspective enables you to set up users, configure the mail server and change authentication settings on the SuiteCRM Analytics Server. |
2 |
Users & Roles |
Manage the SuiteCRM Analytics users or roles for the SuiteCRM Analytics Server. |
3 |
Mail Server |
Set up the outgoing email server and the account used to send reports through email. |
4 |
Settings |
Manage settings for deleting older generated files, either manually or by creating a schedule for deletion. |
Running Reports
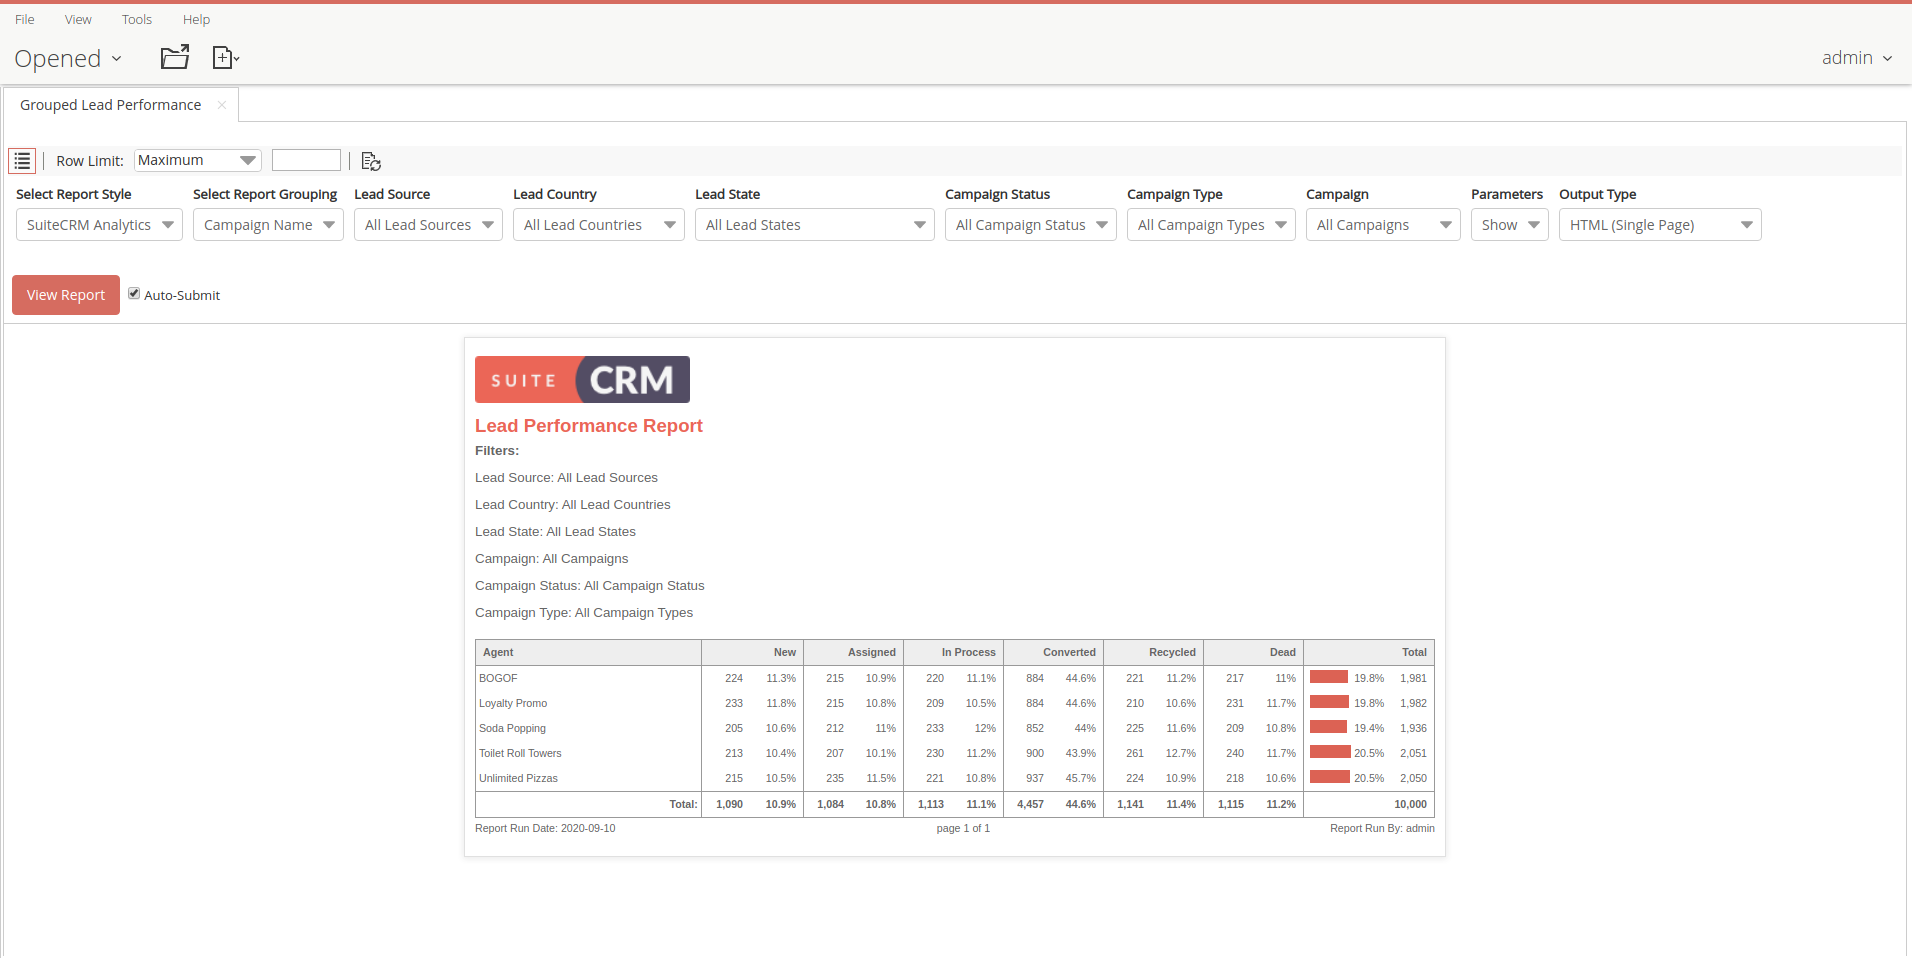
To run Reports you simply have to navigate to the Public > SuiteCRM Analytics > Reports folder and you will see the list of reports in the middle panel. Here you can double click the report you wish to run and it will open in a new tab. You also have report options on the right side panel to open the Report in a new browser window.
The report will execute immediately based on default filter values. You can now edit the report filters and properties. Each change to a report filter or property will cause the report to refresh. You can turn this functionality off by unchecking the Auto Submit checkbox and instead click View Report when you are happy with the filters selected.
Running Dashboards
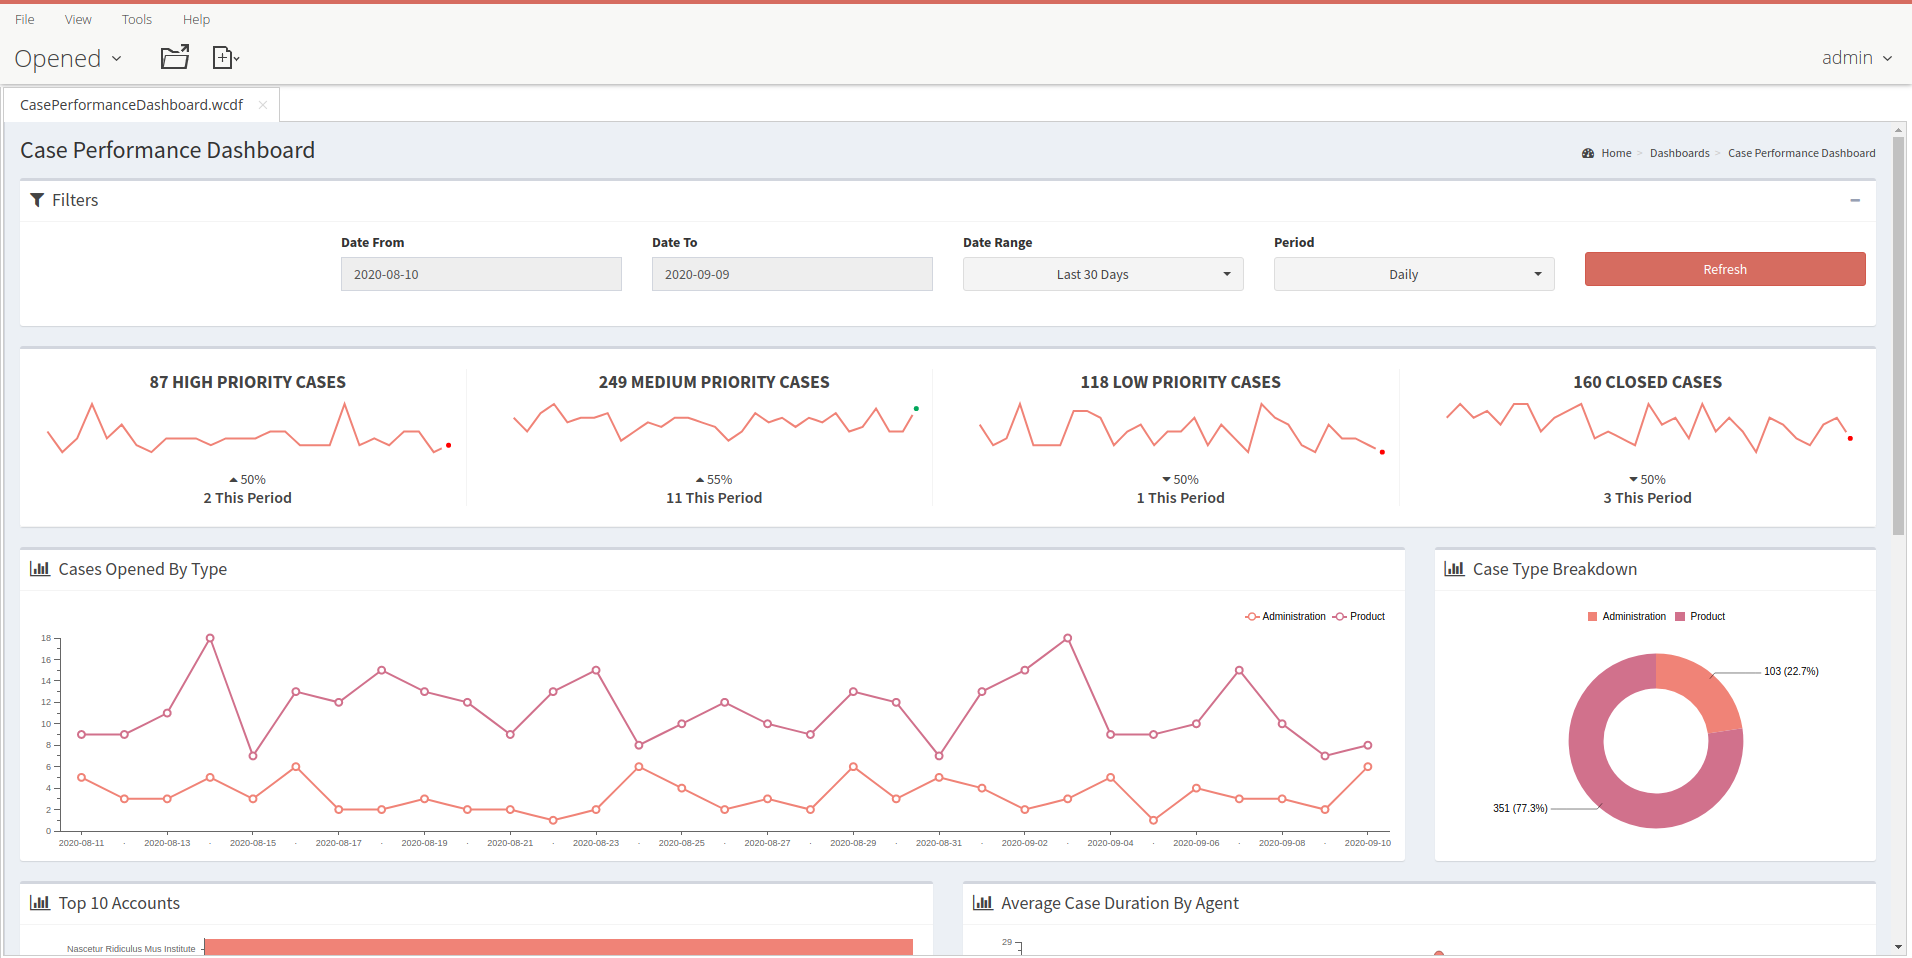
Running dashboards is done the same way as running a report. We simply navigate to the Public > SuiteCRM Analytics > Dashboards folder in the Solution Browser and double click any of the dashboards we wish to run. This will open up the dashboard in a new application tab where the user can select various data filters and click the Refresh button to execute the dashboard.
Managing Users & Roles
This section provides an overview of the default assignments for users and roles, the permissions included, and the management of users and roles in the SuiteCRM Analytics User Console. You must login to the User Console as an administrator (or be assigned to a role that has Administer Security permission) to manage users and roles for SuiteCRM Analytics Security.
Here is how you can manage users:
-
Add Users
-
Change User Passwords
-
Delete Users
-
Assign Users to Roles
Here is how you can manage roles:
-
Add Roles
-
Assign Permissions to Roles
-
Delete Roles
-
Assign Roles to Users
You can control users and roles in the User Console with a point-and-click user interface. The Users & Roles page allows you to switch between user and role settings. You can add, delete, and edit users and roles from this page.
Access to files or folders can also be refined using the Browse Files perspective in the User Console. Each file or folder can use the default permissions or permissions can be customized for specific users and roles.
Sample Users, Default Roles, and Permissions
By viewing the sample user and default role examples you can get ideas about ways to define actual users and specific roles.
-
Login to the User Console. Click Home > Administration. The Administration perspective opens the Users & Roles page with the Manage Users tab selected.
-
Highlight a user in the users list to display which roles are available for that user, as well as which role is currently defined for that user.
-
Select the Manage Roles tab to display the Operation Permissions for the user’s role, as defined by the checked boxes. These roles, added for your convenience, can be removed or altered based on your needs (see Table 1). Each default role and sample user comes with a standard set of permissions, which provides for a specific set of capabilities when using SuiteCRM Analytics tools and the SuiteCRM Analytics Server (see Table 2).
-
Select the System Roles tab to display the user’s system role. System Roles are built-in roles used to control default behaviors and permissions in the User Console, handled implicitly or through system configuration, with automatic assignments. The default system role for all users is Authenticated. If you want to restrict permissions, the Authenticated role must be restricted or removed from the user.
| Default Role | Sample User | Default Operation Permissions |
|---|---|---|
Administrator |
admin |
|
Business Analyst |
pat |
|
Power User |
suzy |
|
Report Author |
tiffany |
|
| Operation Permission | Definition |
|---|---|
Administer Security |
The default Administrator role automatically conveys all operation permissions to users assigned to that role, even if the check box next to it is cleared. These permissions include the Read and Create Content permissions, which are required for accessing the Administration perspective.
|
Schedule Content |
|
Read Content |
|
Publish Content |
This permission includes tools such as Report Designer, Schema Workbench, and Metadata Editor.
|
Create Content |
|
Manage Data Sources |
|
Add Users
-
With the Manage Users tab selected, click the plus (+) sign. The New User dialog box appears.
-
Enter a new User Name and Password, then Confirm Password and click OK. The new user account is active and displays in the Users list.
Change User Passwords
-
With the Manage Users tab selected, click the user for whose password you want to edit. The user’s information populates to the right of the Users field.
-
Click Edit. Enter the New Password and Confirm Password then click OK. The password is changed and the user is able to login with the new password.
After you have logged into the User Console for the first time, it is a best practice to change the default administrator password.
Delete Users
-
With the Manage Users tab selected, click the user or users in the Users list that you want to delete.
-
Click the X to delete the user or users. The Delete User confirmation dialog box appears.
-
Click Yes, Delete to delete the user(s) and refresh the user list. The selected user accounts are deleted and the users are no longer able to login to the SuiteCRM Analytics Server.
Assign Users to Roles
-
With the Manage Users tab selected, click to highlight the user from the Users list that you want to associate with a role.
-
In the Available list, click to highlight the role that you want to associate with the selected user.
-
Click the right arrow (>) to move the role to the Selected list.
-
You can remove a role from the Selected list by highlighting that role and clicking on the left arrow (<). The role moves from the Selected to Available list, and the user no longer has the associated permissions. The user now has all of the permissions associated with the role in the Selected list
Add Roles
-
With the Manage Roles tab selected, click the plus (+) sign. The New Role dialog box appears.
-
Enter a new Name for the role, then click OK. The new role is created, and appears in the Available roles list. After adding a new role, you need to assign operation permissions to it, see Assign Permissions to Roles, below, for details.
Assign Permissions to Roles
-
Make sure that the role is highlighted in the Roles list.
-
Click in the check boxes in the Operation Permissions list. The role has permissions assigned to it, and users associated with that role have those permissions.
Delete Roles
-
With the Manage Roles tab selected, click the role or roles you want to delete.
-
Click the X to delete the role(s). The Delete Role confirmation dialog box appears.
-
Click Yes to delete the role(s) and refresh the role list. The selected role is deleted and is no longer available on the server. The users who were associated with that role are no longer associated with it. Other roles assigned to users are not affected. If users have only one role assigned to them and that role is deleted, then the users have no role assigned to them. The default role is Authenticated and all users have that role unless you remove it.
Assign Roles to Users
-
Make sure the Manage Roles tab is selected, then click the role in the Roles list that you want to associate with a user or users.
-
In the Available list, click the user or users that you want to associate with that role.
-
Click the right arrow (>) to move the users to the Selected list. You can click the double-right arrow (>>) to move all users from the Available list to the Selected list.
-
You can remove users from the Selected list by highlighting that user and clicking on the left arrow (<). The user moves from the Selected list to the Available list, and no longer has the permissions associated with that role. The users that appear in the Selected list are now tied to the highlighted role and have all of the permissions associated with that role.
Run Files in Background
You can run reports in the background from the User Console.
Perform the following steps to run a report in the background:
-
Log on to the User Console, and then click the Browse Files button.
-
In the Folders pane, browse to the folder containing the file that you want to run.
-
In the File pane, click on the file that you want to run.
-
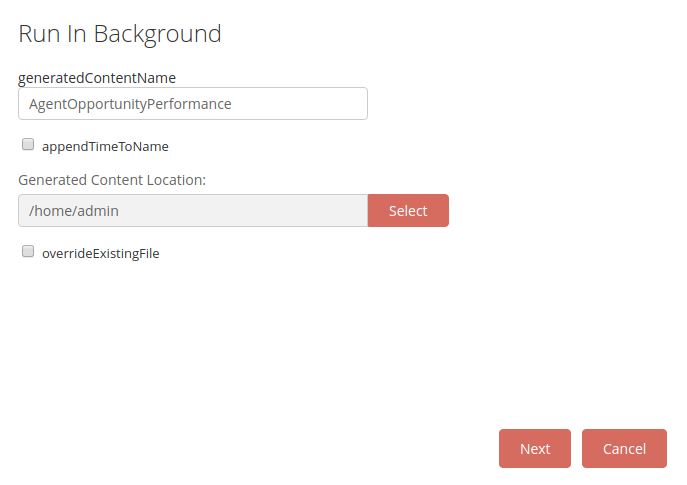
In the File Actions pane, click Run in background. The Run In Background dialog box displays.
-
Enter your selections for the following fields.
| Field | Description |
|---|---|
Generated Content Name |
Specify a name for the generated content. If no name is entered in the Name field, the default is the report name. |
Append Time To Name |
Click this check box to append the value specified in the Generated Content Name with a timestamp. When selected, a menu displays with a list of timestamp format options. Use the Preview panel to view how the name will display on the generated file. |
Generated Content Location |
Specify a location for the generated content. Click Select to browse to a folder location to choose it. |
Overwrite Existing File |
Click this check box to overwrite any existing files that have the same name and timestamp as the one you are running and saving to the specified location. |
-
Click Next. If the selected report has run parameters, such as Output Type, you will be asked to specify them here.
-
When you have completed your parameter selections, click Finish.
The system will deliver the content generated from the report to your specified location.
Schedule Reports
You can use the Schedules page of the User Console to schedule a report to run at regular intervals, on certain dates and times, and with different parameters. You can also set a scheduled report to be emailed automatically, if your system administrator has configured the server for emailing reports. After you schedule a report, you can pause or delete a schedule, as well as edit the schedule to change the frequency of the report, parameters, or email settings.
The system administrator may set up times when you cannot run a scheduled report, for example, to perform system maintenance, or to minimize scheduling during peak times. If any blocked out times are set up, you can view these times so you can choose an alternate schedule.
Schedule Report
You can run reports from the User Console using scheduling options to launch reports during off-peak hours or on a recurring basis.
-
Log on to the User Console, and then click the Browse Files button.
-
In the Folders pane, browse to the folder containing the file that you want to run.
-
In the File pane, click on the file that you want to run.
-
In the File Actions pane, click Schedule. The New Schedule dialog box displays.
-
Enter your selections for the following fields
| Field | Description |
|---|---|
Schedule Name |
Specify a name for the schedule, which will also be the name of the generated report content. If no name is entered in the Schedule Name field, the default is the name of the report file. |
Append Time To Name |
Click this check box to append the value specified in the Generated Content Name with a timestamp. When selected, a menu displays with a list of timestamp format options. Use the Preview panel to view how the name will display on the generated file. |
Generated Content Location |
Specify a location for the generated content. Click Select to browse to a folder location to choose it. |
Overwrite Existing File |
Click this check box to overwrite any existing files that have the same name and timestamp as the one you are running and saving to the specified location. |
-
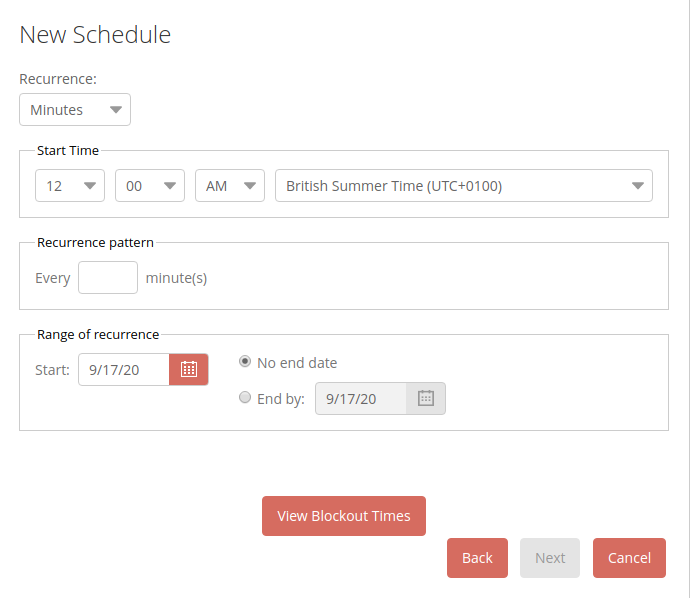
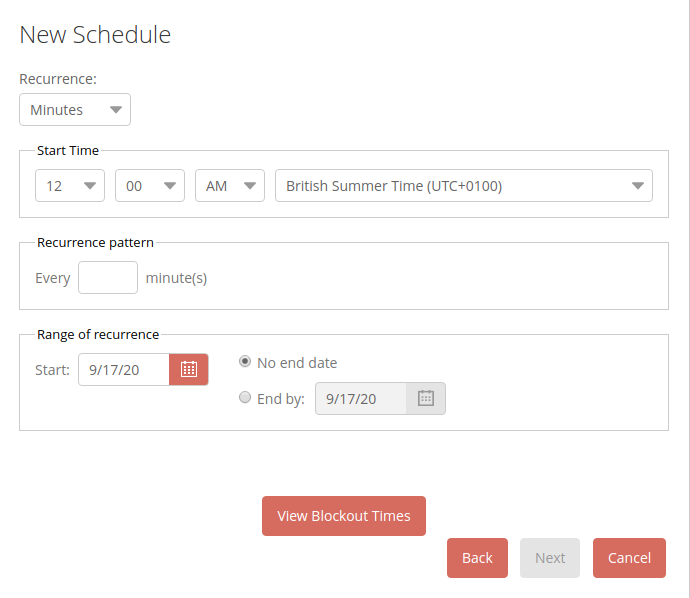
Click Next. The schedule fields display
-
If selecting a recurrence, be sure to select start and end dates, as well as a recurrence pattern.
| Field | Description |
|---|---|
Recurrence |
Choose a time interval for the report from the Recurrence list. Options include:
If blockout times have been scheduled by your administrator, a View Blockout Times button appears on the bottom of the New Schedule window. Click View Blockout Times to view the list of blockout times. |
Recurrence Pattern |
Depending your selected time interval in the Recurrence field, specify the recurrence pattern. |
Range of Recurrence |
Specify the start and end dates for running this report. The report will begin running according to the specified recurrence pattern on the start date specified and complete its run cycle on the end date specified in this section. |
Start Date (Run Once) |
If you select ‘Run Once’ for Recurrence, then specify the date to run the report. |
Cron String (Cron) |
If you select ‘Cron’ for Recurrence, then specify the Cron syntax. Consult the Quartz Cron Attributes reference to learn the Quartz Cron syntax. |
When you set up a Cron schedule you must remember that it will start at 12 noon server time in the Start Date selected. This means if you create a new schedule at 9am to run every 15 minutes, it will only start running at 12:00 on the Start Date selected. To make sure your cron schedule starts executing straight away its best to select the day prior to today’s date. That will allow the cron job to be active right away.
-
Click Next. The selected report may run using several parameters which you may be asked to specify, such as output type.
-
If your SuiteCRM Analytics administrator has set up an email server, you may elect to email a copy of the report to selected users. For example, you may want users in the Finance department to receive the Excel output of the report via email every time the report is run on the recurring schedule.
-
Click No to skip emailing a copy of the report to users.
-
Click Yes to email a copy of the report to users. Fill in the fields that display with the users’ details, and then click OK.
-
-
When you have completed your parameter selections, click Finish.
Edit a Schedule
You can edit a schedule to change the frequency of the scheduled report, report parameters, and email settings.
-
Click the Home drop-down menu on the upper-left and click the link to the Schedules. The list of schedules appears in the Schedules page.
-
Click the schedule you want to edit in the list, then click Edit in the scheduling toolbar. The Edit Schedule window appears.
-
Type to rename the schedule in the Schedule Name field.
-
Choose a new time interval for the report from the Recurrence list.
-
Choose a new Start Time and Recurrence Pattern, as well as new Start and End Dates for the schedule. Click Next. If blockout times have been scheduled by your administrator, a View Blockout Times button appears on the bottom of the New Schedule window. A list of blockout times is viewable by clicking View Blockout Times.
-
Choose what type of file you would like the schedule to create from the Parameters field. Click Next. The email option will only appear if your system administrator has enabled email on the server.
-
If you do not want to email a copy of the report, choose No.
-
If you want to email a copy of the report, choose Yes. Fill in or edit the fields that appear.
-
-
Click OK.
The schedule is edited and appears in the list in the Schedules window of the console.
Delete a Schedule
After you have scheduled a report, you can easily delete the schedule without deleting the report.
-
Click the Home drop-down menu on the upper-left and click the link to Schedules. The list of schedules appears in the Schedules page.
-
Click the schedule that you want to delete in the list. The schedule is highlighted.
-
Click Delete in the upper right of the toolbar to delete the highlighted schedule. This deletes the schedule while leaving the report intact.
Manage Schedules
As an administrator, you may create, run, delete, stop, edit, or resume schedules through the Schedules page. After a report is scheduled by any user, an admin may edit, pause, or delete that schedule, as well as change the frequency of the report, change parameters, or adjust email settings. To distribute reports using email, make sure you have configured the email server.
Set Up Emails for Scheduled Reports
A convenient way to share reports is to specify an email server to be used by the SuiteCRM Analytics Server to send these reports to recipients. This feature works with the report scheduling feature to automate the process of emailing reports to your user community. Having an email server is not required to configure the SuiteCRM Analytics Server. If you want to get started quickly or do not have information about your email server, skip this for now. You can always come back to it later.
About the Mail Server Page
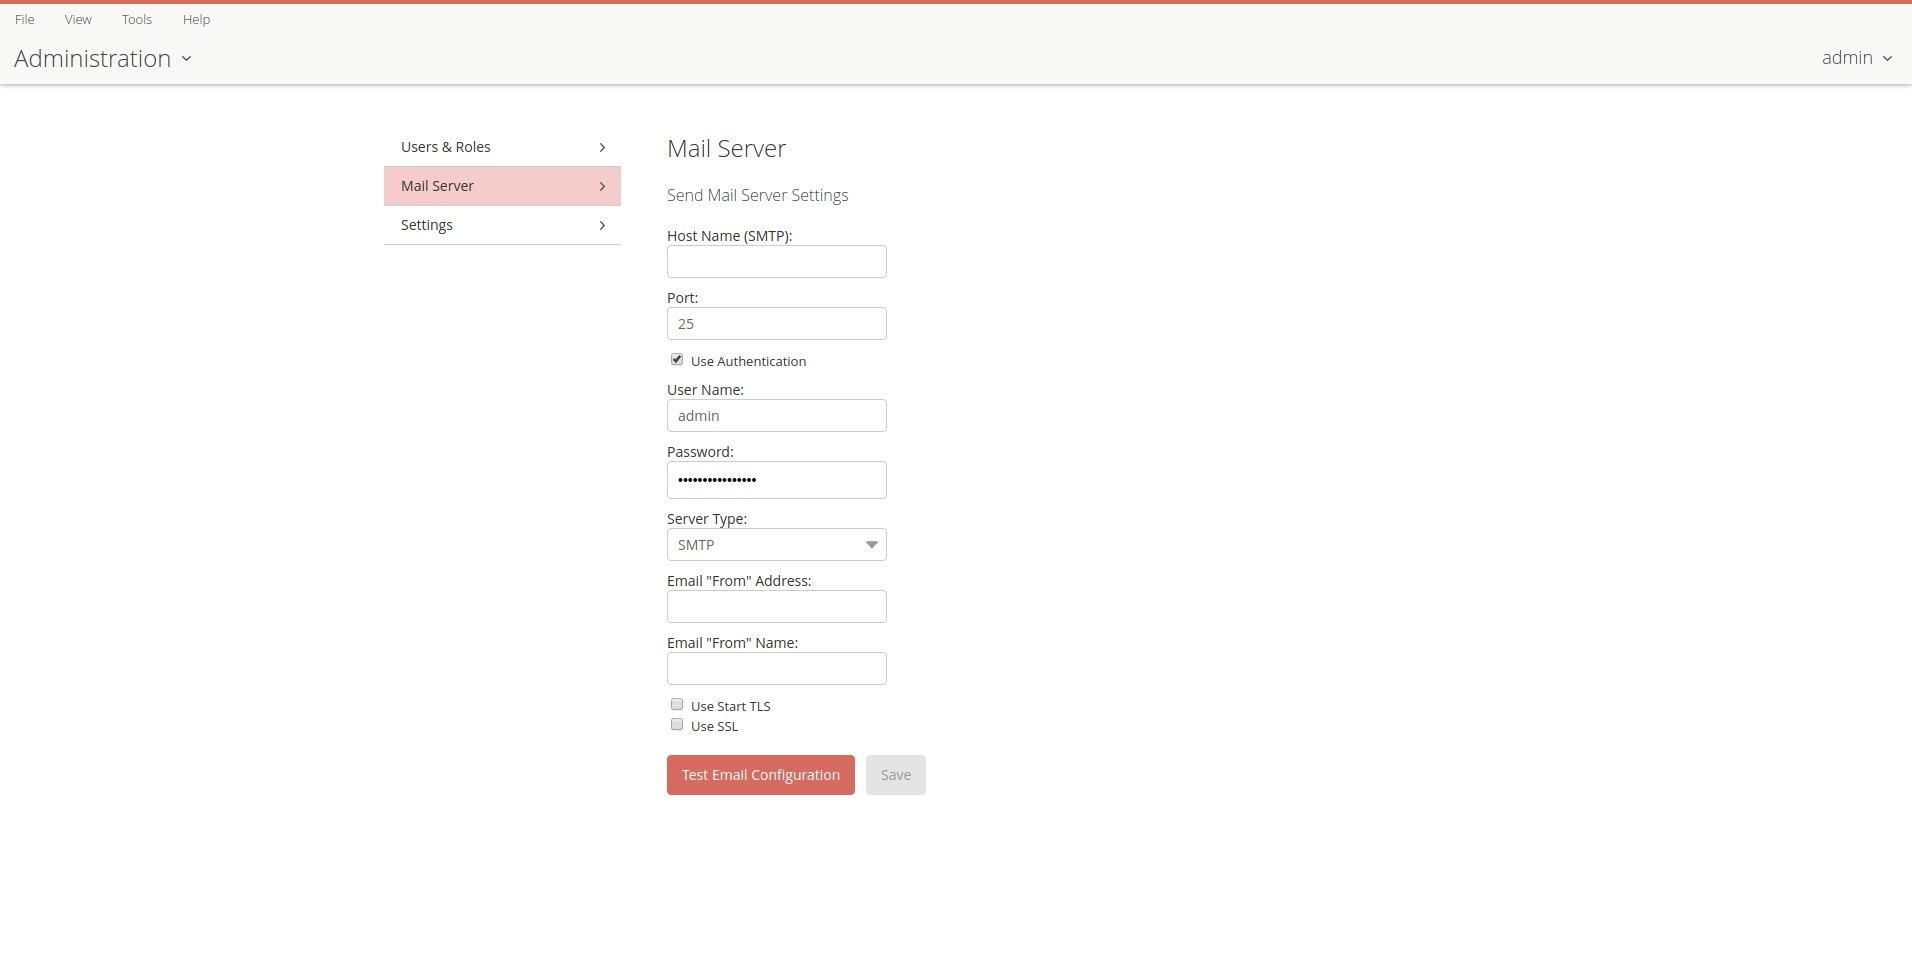
You use the Administration page within the SuiteCRM Analytics User Console and access Mail Server to set up the e-mail server, as shown in the following example steps:
-
Log on to the Suitecrm Analytics Console, click Administration in the upper-right corner, then click Mail Server from the items on the left. The Mail Server page appears.
-
Enter your email server settings
| Setting | Description |
|---|---|
Hostname (SMTP) |
Address of your SMTP email server for sending email. |
Port |
Port of your SMTP email server, usually 25. For Gmail, the value is 587. |
Use Authentication |
Enable to use authentication for email. User Name User ID to connect to the email server for sending email. |
Password |
Password used to connect to the email server. |
Server Type |
Transport for accessing the email server, usually SMTP. For Gmail, SMTP is required. |
Email From Address |
Address that appears in the From field in an email.If left blank, the default email address for this field is Pentaho Scheduler. |
Email From Name |
Name that appears in the From field in an email. If left blank, the default email name for this field is SuiteCRM Analytics Scheduler. |
Use Start TLS |
Enable if the email server requires a Start TLS connection. |
Use SSL |
Enable if the email server requires an SSL connection. This value must be enabled for Gmail. |
-
Click Test Email Configuration, then click Save. A success message appears.
Quartz Cron Attributes
The Quartz cron engine supports a seven-attribute time declaration with many possible values. The number format is the same for every expression, even if the values are different — it must be listed as seconds, minutes, hours, day of month, month, day of week, then the year. A space separates each attribute.
These are the possible values for each attribute: 0 to 59 for seconds and minutes, 0 to 23 for hours, 1 to 31 for days, 1 to 12 for months, 1 to 7 for day of week, and a four-digit year. Alternatively, you can use three-letter values for the day of week (SUN, MON, TUE, WED, THU, FRI, SAT). However, three-letter values for the month (JAN, FEB, etc.) are not supported. For months, use numbers 1-12.
An asterisk (*) indicates all values, so an asterisk in the minute field would mean that the report runs once every minute. You can specify a range of values with the - (dash) operator, and you can specify multiple individual values with a comma. If you need to excuse a value in the day of month and day of week field from a cron job, you can use the question mark (?) character to indicate that this value doesn’t matter. If you need to split values, you can do so with the slash (/) character — this operator literally means "every," so 0/15 would mean "Every 15." In the day of month field, you can use the # character to indicate a certain instance of a day of the month, for instance the second Friday of the month would be 6#2.
You can use a capital L in the day of month and day of week field to indicate "Last," as in the last day of the week or month. A capital W in the day of month attribute means "Weekday," which only encompasses Monday through Friday. The W character can only be specified when the day-of-month is a single day, not a range or list of days. Most of these values can be combined to accommodate unusual cron schedules.
| Attribute | Conditionals and Operators |
|---|---|
Seconds |
, - * / |
Minutes |
, - * / |
Hours |
, - * / |
Day of Month |
, - * ? / L W |
Month |
, - * / |
Day of Week |
, - * ? / L # |
Year |
, - * / |
Sample Cron Strings
| Cron | Description |
|---|---|
0 0/30 * * * ? * |
Every 30 minutes every day of the year |
0 15 10 ? * 6L * |
10:15 AM on every last Friday of every month. |
0 30 10 ? * TUE,WED,THU * |
10:30AM every Tuesday, Wednesday and Thursday |
You can generate Cron strings using this website - http://www.cronmaker.com/
Data Cache
The SuiteCRM Analytics Server comes with Data Caching capabilities. When a report or dashboard is run, certain data will be cached for future executions. It’s important to understand that when the Data Warehouse is updated you may also have to refresh the SuiteCRM Analytics Server Cache.
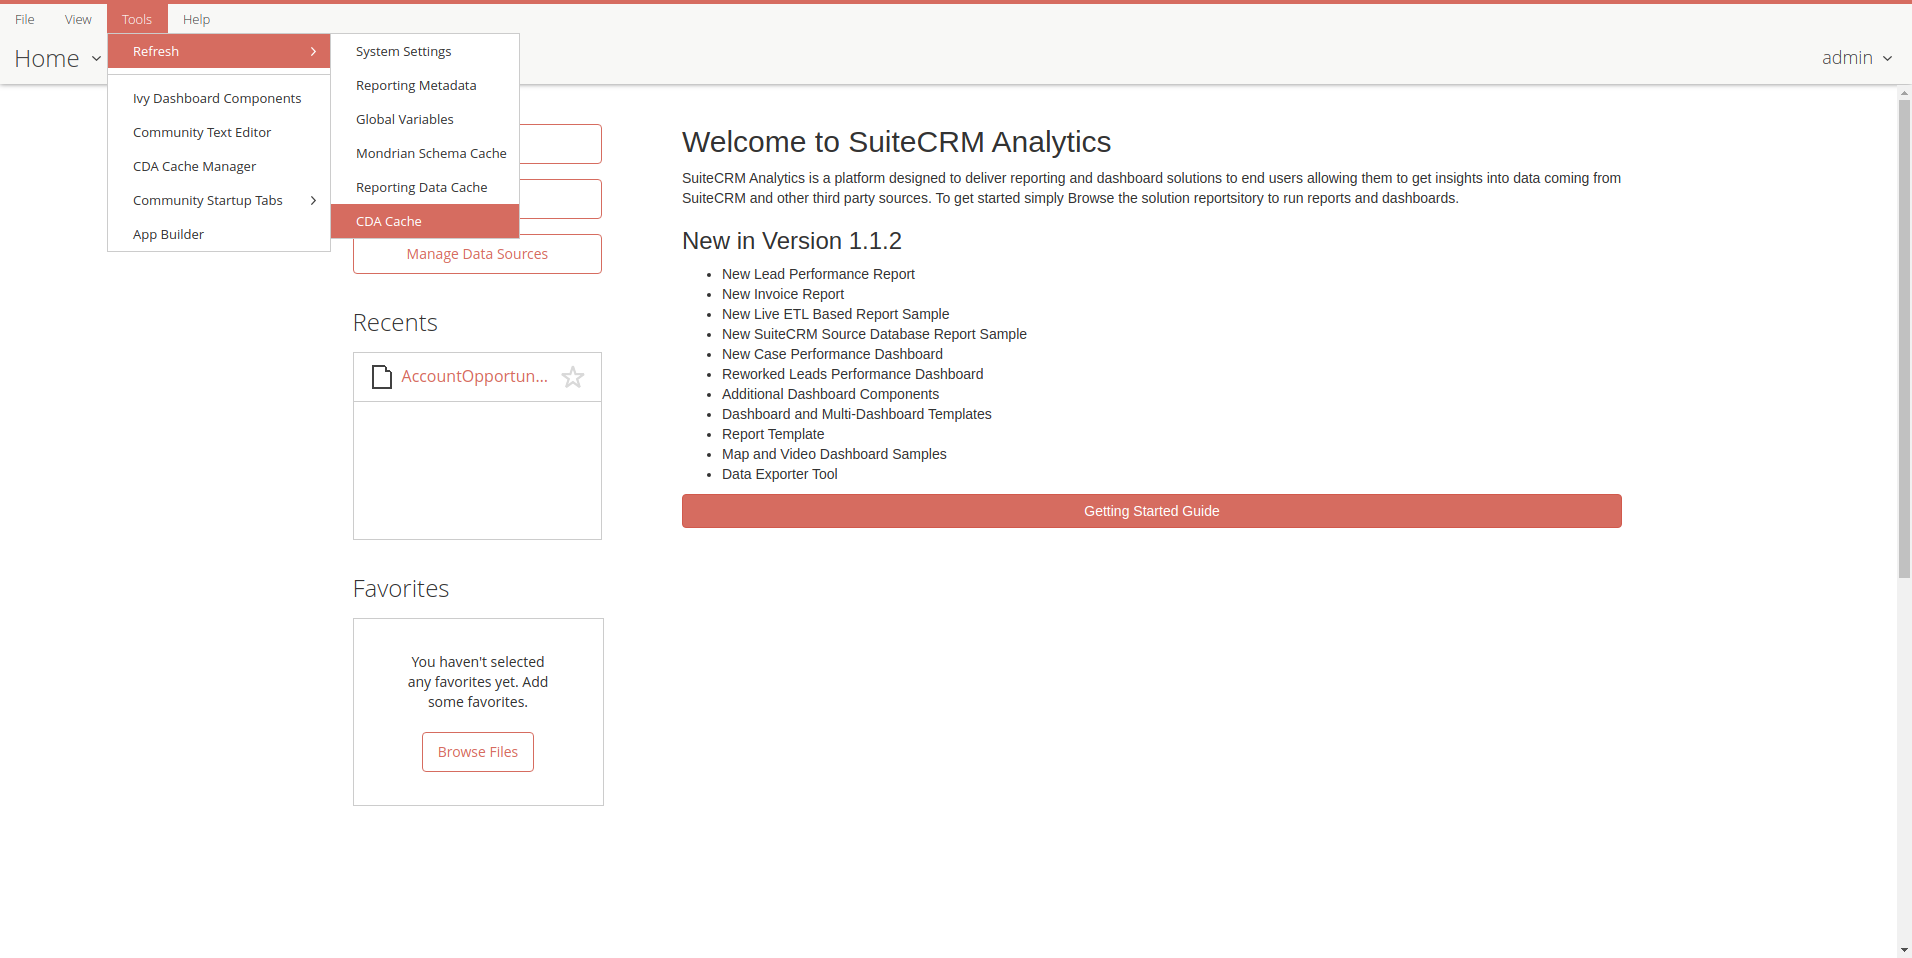
Refresh CDA Cache
The CDA Cache serves the charts and dashboards supplied with SuiteCRM Analytics. This also includes any charts that are rendered in reports. To refresh this cache you can follow these steps
-
Log on to the Suitecrm Analytics Console
-
Click the Tools menu
-
Select Refresh > CDA Cache
This will open a new tab informing you when the CDA cache has been cleared.
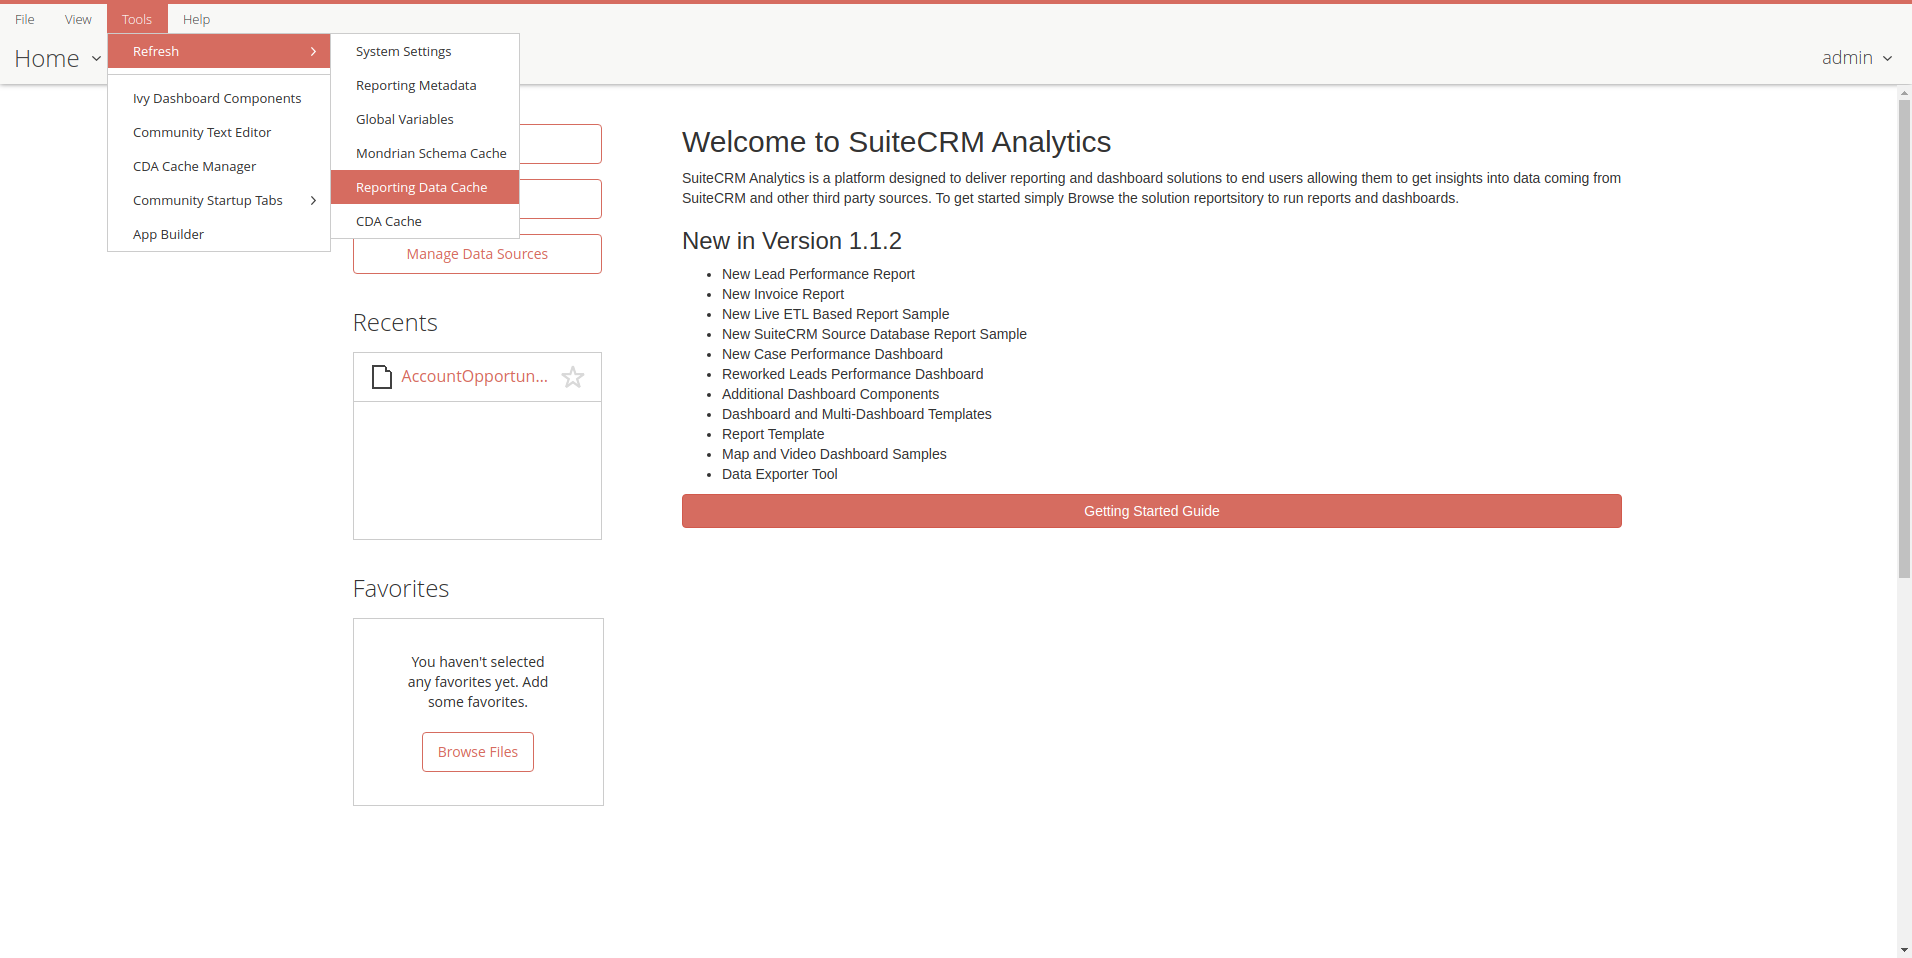
Refresh Reporting Data Cache
The Reporting Data Cache serves the data in reports but not the charts in reports. To refresh this cache you can follow these steps:
-
Log on to the Suitecrm Analytics Console
-
Click the Tools menu
-
Select Refresh > Reporting Data Cache
This will display a popup informing you when the Reporting Data cache has been cleared.
